Tuesday, December 29, 2009

Soling Sailboat Specs

Embedded Linux Router (Home Made)

first Ingredients

Fujitsu Futro S 400

Linux Router fli4l

image


image

  • boot from CF card
  • On Board LAN
  • Quiet (because without a fan)
  • power saving
  • PCI slot for DSL modem
  • LPT port for LCD display
  • priced (factory outlet € 40)
  • Mini Linux Router
  • Open Source
  • lot of additional packages available
  • widespread and stable
  • hardware is supported
  • favorable (0 €)

AVM PCI DSL modem

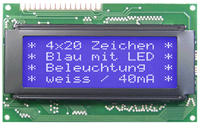
LCD display
image

image

  • driver support for Linux
  • widespread
  • Cheap (eBay € 10)
  • The basic status display
  • Man a PC monitor connected via LPT
  • need cable
  • No driver / controller as
  • Cheap (eBay € 12)

second Preparation

What was to be observed in the configuration?

On the project side of fli4l there are plenty of instructions, suggestions and ideas put together his router. Even with a Windows PC, the image on CF card created are:
image

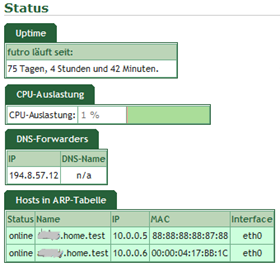
configure the HTTP server for monitoring, you can monitor the PC in the home network from the status of the router and perform simple control tasks.

image

third Cooking time is now or braised

: The LCD panel is soldered to an old LPT printer cable. It is best to have a potentiometer on front can regulate the brightness. The LPT printer cable is then clamped to the parallel port. still needs to be configured before the LDC module. And finished the mini-display with status display ...

is 4 After a proffer

Some testing was done and the router, he could enter service.

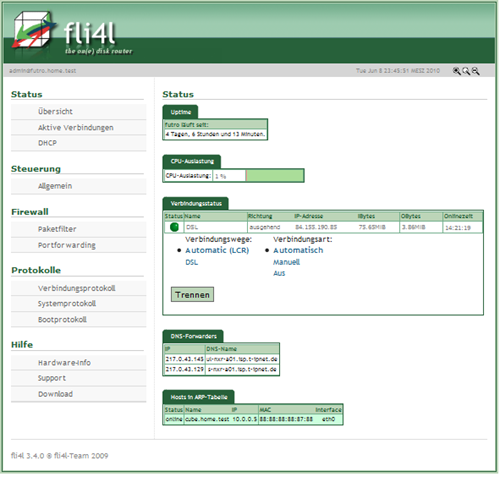
My DSL connection has frequently malfunctions. It is disconnected from the network provider for a short time. This brought my old router to crash regularly. Usually helped only a hard reset. My new router the other hand, is very stable. For a net separation it connects immediately and you hear an audible signal that he does so (See "Configuration IMOND_BEEP = 'yes'). And so on and on and runs the router:

image

5th Season to taste

The configuration of the router on each module Config files (eg base.txt., Dsl.txt, etc.) are carried out. The configuration parameters must be especially adapted to the hardware (CF card, DSL modem and LCD display). Modules are not needed, you can delete the appropriate config files.

image

Listed here are the most important settings in the config files used.

a) Configuration base.txt

 #----------------- # General settings #----------------- HOST NAME = 'FUTRO' # name of fli4l router PASSWORD = 'secret' # password for root login BOOT_TYPE = ' hd '        # boot device (fd, hd, cd, etc)
MOUNT_BOOT=' rw ' # mount boot device (ro, rw, no)
BOOTMENU_TIME=' 1 ' # waiting time of bootmenu
#---------------
# Debug Settings
#---------------
DEBUG_STARTUP='no' # write an execution trace of the boot
# Wert auf 'yes' setzen,
# um Fehler beim Booten zu finden
#----------------------
# Ethernet card drivers
#----------------------
NET_DRV_N='1' # number of ethernet drivers to load
NET_DRV_1=' r8169 ' # 'r8169' für Futro onboard LAN NET_DRV_1_OPTION =''# additional option (not required) #---------------------------------- --- # Ether networks used with IP protocol #------------------------------------- IP_NET_N = '1 '# number of IP ethernet networks, usually a IP_NET_1 = '10 .0.0.1 / 8' # IP address of your ethernet card IP_NET_1_DEV = 'eth0' # required: device name like ethX #--------- ------------------ # Packet filter configuration #--------------------------- PF_NEW_CONFIG = 'yes' # new style packet filter config Config of the packet filter to customize your own network! (For example, assume start of document) #-------------------------------------- ----- # Simple DMZ setup for dial-up based routers #-------------------------------------- ----- OPT_DMZ = 'no' # Therefore you another # LAN interface would need! # (Futro S400 has unfortunately only one) #------------------------------------- ------------- # Domain configuration (DNS, DHCP servers and hosts) # (Details 'outsourced' in the package DNS_DHCP.txt) #---------- ---------------------------------------- DOMAIN_NAME = 'home.test' # your domain DNS_FORWARDERS name = ' 194.8.57.12 ' # DNS servers of your provider # (Ich nutze: ns.n-ix.net)
#--------------------
# imond configuration
#--------------------
START_IMOND='yes' # start imond: yes or no
IMOND_USE_ORIG='yes' # use the original version of imond
IMOND_PORT='5000' # port (Don't open it to the outside!)
IMOND_PASS='geheim' # imond-password, may be empty
IMOND_ADMIN_PASS='geheim' # imond-admin-password, may be empty
IMOND_LED='' # tty for led: com1 - com4 or empty
IMOND_BEEP=' yes' # beep if connection going up/down
IMOND_LOG='yes' # log /var/log/imond.log: yes or no
IMOND_LOGDIR='/var/log' # log-directory, e.g. /var/log
IMOND_ENABLE='yes' # accept 'enable/disable' commands
IMOND_DIAL='yes' # accept 'dial/hangup' commands
IMOND_ROUTE='yes' # accept 'route' command
IMOND_REBOOT='yes' # accept 'reboot' command

#------------------------------
# Generic circuit configuration
#------------------------------
IP_DYN_ADDR=' yes' # use dyn. IP addresses (most providers do)
DIALMODE='auto' # standard dialmode: auto, manual, or off


g) Konfiguration tools.txt


 #------------------------
# Optional package: Tools enable #------------------------ # all the tools you need on the Linux Router # traceroute example example OPT_TRACEROUTE = 'yes '# install traceroute OPT_TRACEROUTE6 =' yes' # install traceroute6

httpd.txt e) Configuration

 #------------------------- --------------------- # package Optional: HTTP server for monitoring #-------------------- -------------------------- OPT_HTTPD = 'yes' # install monitoring webserver HTTPD_PORT = '81 '# TCP port for webserver HTTPD_USER_N = '1' # number of users for the webserver HTTPD_USER_1_USERNAME = 'bernie'   # name of the 1st user
HTTPD_USER_1_PASSWORD='geheim' # password of the 1st user
HTTPD_USER_1_RIGHTS='all' # access rights of the 1st user
HTTPD_GUI_LANG='auto' # choose language for web administration
HTTPD_GUI_SKIN='default' # choose any supported skin
HTTPD_ARPING='yes' # activate arping to hosts
# view arp state of hosts


d) Konfiguration hd.txt


 #---------------------------------------
# Optional package: HD controler drivers
#---------------------------------------
OPT_HDDRV='yes' # install drivers for harddisk
HDDRV_N='1' # number of HD drivers to load, usually 1
HDDRV_1=' ide-hd '# 1st driver: name (eg ide-hd) # (CF card as the integrated IDE HD) HDDRV_1_OPTION =''# 1st driver: additional option #----------- ---------------------------------- # Optional package: install on HD or Flash Disk #------ --------------------------------------- OPT_HDINSTALL = ' no' # install on harddisk # (only required if installing over the LAN) #------------------------------------ ----------- # package Optional: Power-Down for IDE hard disk #---------------------------- ------------------ OPT_HDSLEEP = 'no ' # HD power down after some time HDSLEEP_TIMEOUT = '5 ' # Wait 2 minutes until power down # (for CF cards are not necessary)

Tuesday, December 1, 2009

L Hawkins Pressure Cooker Safety Valve

Sprint Review & Retrospective with Scrum for Team System


In this section, I describe how we use Scrum for Team System in sprint reviews and retrospectives at Sprint. And so we do not manage impediments to Scrum for Team System ...

Part 1: Sprint planning
Part 2: Daily scrums
Part 3: Sprint Review & Retrospective

Part 3: Sprint Retrospective Reviews &

3.1 Sprint Review
At the Sprint Review is where the team members, the product owner or experts. It is presented on a projector, the product increment.
was successfully implemented, the appropriate product backlog items to "done" to be set. If a product backlog item but not the ideas, needs to be improved. Such a product backlog item stays with the status "in progress" in the product backlog and is the highest priority for the following sprint at the top. We usually use the task board to set the status of PBI.

3.2 Retrospective
the retrospective we meet for an hour after a sprint to reflecting the activities of the sprint:
  • What was good?
  • What was not so good?
  • What do we do better
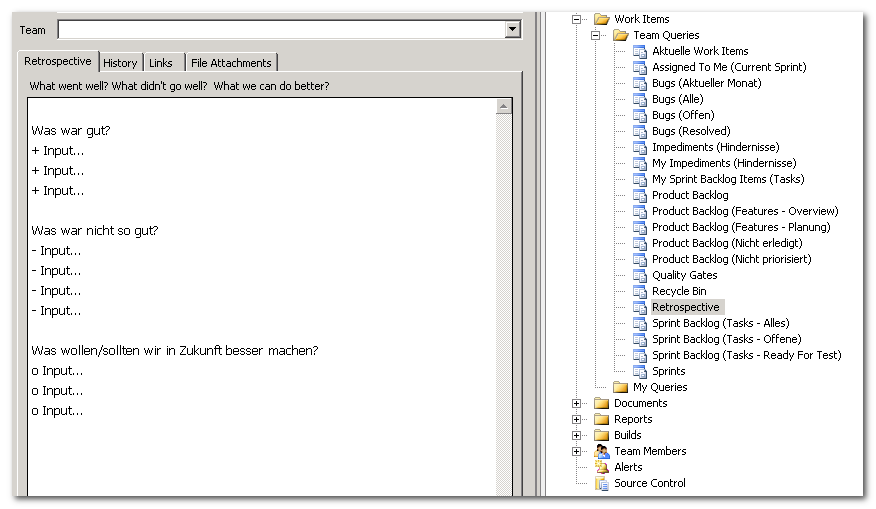
Each team provides "input" The results hold in a Work Item Type "Retrospective" fixed?.


There was still something? Correct the Impediments ...

3.3 Impediments (obstacles) better on a whiteboard!
impediments hinder the team to the product increment to finish. Obstacles must be cleared quickly from the road. To do this is for the SCRUM master. One obstacle, for example, "more RAM for the build-server", or "it still lacks the process consultation with department XY". Our obstacles are complex and usually short-lived. That is why we manage or not it WorkItemType "Impediments" in TFS, but on a whiteboard - for everyone in the team visible!

Thursday, November 12, 2009

05 Honda Civic Licence Plate Holder

Google mania

I was already in the network, as Yahoo was number 1, Microsoft bad driving games with dealers and the custom was astalavista box. I received phone bills of more than 500 DM, as I long nights with the 14 400 municipalities modem Dads by Datex J was underway. I was a hero!

And today?

Today is Google's number 1 I use Google Docs editing of simple text and tables. I use Blogger (see this blog), which belongs to Google. My Youtube account is linked to my Google account, and next year I'll buy a smartphone, which uses Android (the Google OS). On any iPhone Google is hard-wired and some smart phones do not work at more correct if we want to do without Google, as most functions are dependent on a Google Account.

you fall on it? No?

In 10 years every newborn probably rather have a Google account as a birth certificate.

The speed, developed with the new Google applications, is frightening. A few days ago, Google has even (in my opinion, completely unnecessary) new programming language called "Go" was released. Where will it all end
and where will it end? It is never good to leave all power to a single group, but this is happening. Million persons voluntarily store private data on Google, reveal their surfing behavior and give virtually all privacy from a single group. You use the Desktop Products (Chrome, Desktop Search, etc.) and even Google to give the opportunity to get directly to the personal computer.

Google is currently trying, with the Dashboard a little of the growing distrust dispel give, but not award all the data that it knows of its users.

I have personally made the decision for me to delete my account with Google and, where possible, to use other products. The search engine that is somewhat difficult, although bing is quite wide and may extend into the water some time, Google. But there can for all other applications used by me alternatives and I use Youtube without Account.

Addendum:
Funny, I just read in the Focus . Good thing I'm not in such social networks go. Apparently includes data protection problems today for good sound ...

Monday, November 9, 2009

Reactine Affecting Birth Control

conversion of a Adepta Sisters of Battle, Part 2


So, since I had little time, I have only little to make up the figure. Meanwhile, the lady was decapitated, the entire rear collar was also removed. From idea to use
the old face again I'm ready to come for two reasons: 1 I lost the little Zinnteil and 2 I still had lying around a broken thumbnail Celestine, so I have now used their head.

And now everything back fill any
After I've taken great care before the figure so to ruin as possible;), it now goes to the repair. A small mistake on Boltgewehr was filled with green stuff and a new collar was (also modeled from Green Stuff. The leg I have filled with ProCreate again. But it is in the photo here is not quite finished.
The head was attached, the neck and Part of the chin I'm hoping to model tomorrow. Then, if there is still time I will make even the leg finished and my first Sororitas may indeed be primed already.

The color scheme
It was about time to to think about the color scheme of thought. The whole is reminiscent of Treasure's removed, because the back story a little pick up on the grail myth (yes I know this is 2 different things) and I think all the voices so beautiful. In the end it's run out on the following scheme:
Where do I put the decorations (Fleur de Lys and eagles) as "rank symbols to use and simple to replace nurses with other symbols or none at all. Comments in relation to the color scheme are most welcome alternative suggestions you can create hereby

Friday, November 6, 2009

Difference Between Cramps In Early Pregnancy

conversion of a Adepta Sisters of Battle, Part 1

Introduction
This miniature, the first of a Witch Hunter army should be. The army is not explicitly to tournament-quality, power gaming, etc. but with background and history's shelf rather than the playing field.

The miniature
The miniature figurine is a normal out of the box. In contrast to new plastic kits here an individual is to realize Pose etc. much more difficult. Nevertheless, I want the army to do something a bit special.

The slaughterhouse
So as I first saw the thumbnail directly from the leg at the knee. Then through the middle of the thigh. The pose of the figurine, it was unfortunately necessary, the magazine saw through the bolt-gun with.

We will make us a leg chain
Then cut the thigh and easily pierced with a thin drill completely along its length, drilled into the lower leg and the leg after deep roots to drill deep into the hip. Then glued a thin wire (such as floral wire) in the hole in the hip. Then the thigh is threaded onto the wire. Like a pearl on a chain. Thereafter, the upper leg on the wire (but not at the hip!) Fixed with adhesive. Now the wire is cut and then fixed to the lower leg is also on the wire.

And now pose
After the leg is now back at the figure, the Pose set. In my case, the figure stand with one foot on the helmet of a fallen enemy. So, the pose, correct their positions and fixed with adhesive.

go from it?
Next, I'll write some words about the background of my Sisters of the Order. I will then finish the gaps with Green Stuff and anmodellieren the magazine again. I will then grind the shoulder armor and put in place the current "Fleur-de-Lys" one's own religious emblem. Then again, it is brutal when I cut the figure most of the head / loop to attach to your own hair with Green Stuff.

Tuesday, November 3, 2009

Shiny Pokemon Chart Pearl

Outdated

My two accounts are expired and I will not reactivate it for now. My motivation is simple EVE currently absolutely 0th It is not in the Corp, the alliance or anything else, is somehow just totally out of the air.

So I will write to stop here first. If I really ever again return to EVE, goes here as well:)

Tuesday, October 20, 2009

Make Your Own Wwe Wrestler World Online

construction of a bolt pistol, Part 3: Interim goal

intermediate target
Thus, the bolt pistol is ready for the games. Given that the heretics have nothing to laugh about;)
Today I painted only the two first Aquila black and then gold.

For the Game's enough first so, since it is feared also that the gun is there to go through a few hands ^ ^

After the Game I will definitely be that "sex" chrome gold shade at the mouth opening more and thus creating a Verrußungseffekt. On clamping mechanism, I may put another plastic card Regiment coat of arms, a look.

Nike Jacket Rn 56323 Ca#05553

construction of a bolt pistol, Update: The 2 Aquila more plans

The Aquila
have just ordered GW Aquila collected. The largest is actually the right size for my purposes, I do not huge, but only 2 small front Aquila would have near the estuary.

As with GW products are still common mass of liquid tin is in the symbols. I will tonight have to file first time before the icons will have their place on the bolt pistol.

with the finish I will wait till after the game and then emphasize details.

same time I ordered 3 copies of the cheaper Maverik, I have some other ideas for rebuilding. And the Nerf N-Strike Recon CS-6 is also still at my house and waits to be converted to a M36 rifle laser.
A nice template for the laser gun, I found the Inquisitonstrupp 23 ( Link ) and Lexicanum ( Link )

Monday, October 19, 2009

Legs Go Numb After Taumatic Accident

construction of a bolt pistol, Part 2 and: Entnerfizierung, paint and reassemble

Continued from construction of a bolt pistol, Part 1
The Entnerfizierung
The removal of decals and logos was relatively simple. With a file roughly weggefeilt everything and then smoothed with a scraper. After that, all traces were removed.
The whole thing lasted less than 15 minutes

The painting
The painting was a bit nasty, because the basement where all I did was poorly ventilated.
The metallic color I was much too bright, so I darkened the paint with irregular bursts "Chaos Black" by GW.

Assembly
The assembly went very well, screwed up was completed on the date on which all. Then I noticed this is not the drum turned. So screwed back, looked up, it was all right. Funny so screwed back and ... Drum roll ... It did not work again ... Shit! So
thought, pondered, and then the screws near the rotational mechanism a little loose and viola! The drum was spinning.

Tomorrow evening I will still worried after I had done a few decorations, the decorations and the finish.

Saturday, October 17, 2009

Make Webgame Tempalte

construction of a bolt pistol, Part 1: Design & Cutting

First, for those who do not know what a bolt pistol is a link
The weapon should be suitable for use on LARPs.

Planning:
plans to paint the Nerf gun metal and provided with a golden mouth, and 2 golden Aquila . The weapon
should fit to a (superior), Imperial Commissioner .

Disassembly
be decomposed to decent painting, the Nerf-gun completely.
the weapon after this I also get back together, I took pictures of various steps that you find here . I

the Nerf gun had broken into the following steps: Loosen the bolts on
  1. clamping mechanism (3 pieces) and remove the two shells. This can lead to a snapping noise, as the clamping mechanism connected with a spring in the gun is.
  2. only then can the bolts of the case be resolved, since a screw is located under the clamping mechanism. Thereafter, the housing can be removed easily.
    The side with the screws should be paid on top.
  3. then I've removed the ammunition drum. This is quite easy, as the drum is simply connected.
  4. Then just take out the pressure chamber and the spring
  5. An adjacent
  6. Now I have solved the spring of the clamping mechanism.
  7. then I have removed the trigger (watch out for the spring, otherwise it flies across the room.
  8. Then I have the screws of the Rotary mechanism solved (carefully, the whole is slightly under tension, as under the mechanism is a button with a spring is located.
  9. Finally I removed all the loose parts (knob, spring, river mouth).
The whole structure is not particularly complicated, so I'm optimistic that the whole relatively easy to assemble again leaves.

Thursday, October 8, 2009

Country Song That Goes Du Du Du Dun

Daily Scrum with Scrum for Team System

In this section, I describe how we use Scrum for Team System in our daily Scrum meetings.

Part 1: Sprint planning
Part 2: Daily scrums
Part 3: Sprint Review & Retrospective

Part 2: Daily Scrum Meetings

Our Daily scrums are always held before lunch and take about 15 minutes. Answered each in turn points:
  • What have you done since the last Daily Scrum?
  • what you are going to make up for the next Daily Scrum? Where did you
  • obstacles?
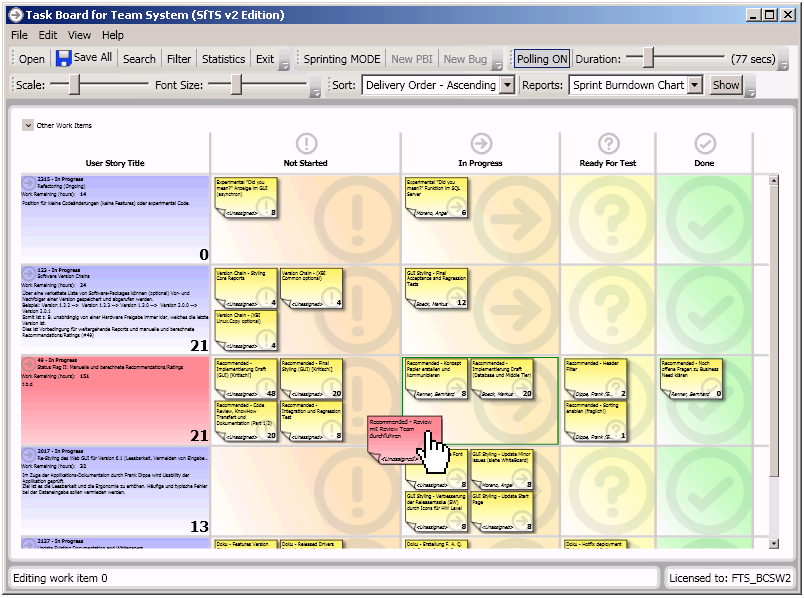
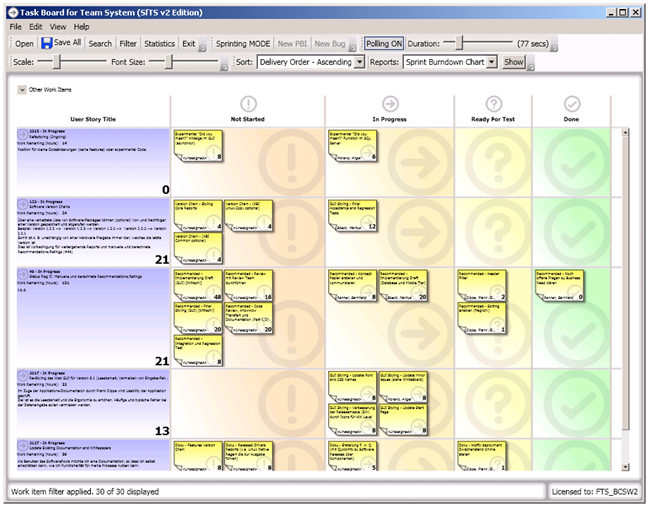
We use the digital task board to record the points raised. When asked "What have you since the last Daily Scrum ?. Made "we refer to a large monitor on the yellow paper, we briefly show the course, progress, context, etc. is their own points and value - if possible -. The time remaining Again, it is so that we . the outstanding hours only estimate of thumb, it just depends on the progress of geimeinsammen

The shift of the yellow piece of paper (the Sprint Backlog Items) easily using drag & drop.

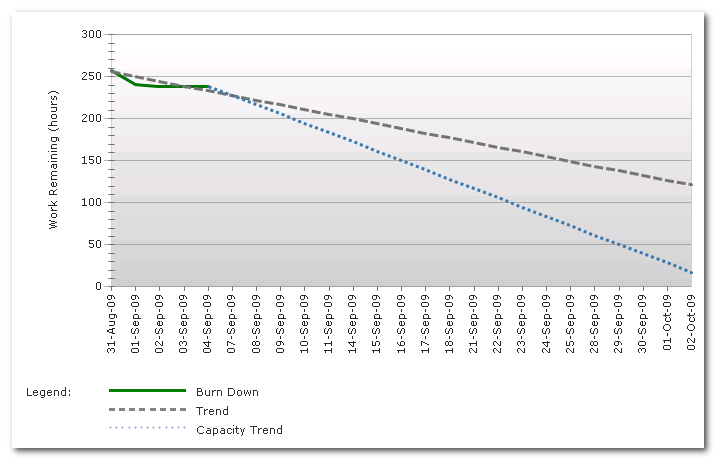
From the "pushing" of Sprint Backlog Items (SPI) during the daily Scrum flow naturally great and meaningful burndown charts with Trend Forecast:

The digital version of the task board brings a lot of positive on the one hand, on the other hand, is missing the tactile experience of just "my yellow card", which I put on the whiteboard to "done". I've heard use the two task teams boards. A classic conventional whiteboard with index cards next to the digital version. Both are synchronized after each Daily Scrum. Also a good idea!

Stouffers Outlet Hours In Solon Ohio

I know what you're flying

Currently I play EVE offline rather than online. The skills run to the right to fill the idiots kill board with kills and I program at the site depp 2.0.

The goals are ambitious. It states, inter alia, an industrial module scheduled and a POS module. I do not want Replace cramp any other tool but the idiots simplify their game.

is currently the module "Fleet Commander" in beta status. This module allows you to get an overview of all the idiots who can fly a specific type of ship. First sounds complicated, so an example.

"Hey Tengu, you know what we have in Capital pilots? I need a fix 20 times Dread pilots, as is ne POS on my right cheek, which must go!"

* klickediklack *... So I can fly the Revelation, Kami the Moros, Navaris Phoenix ne ... "

The DEPP-FC selects the type of ship, which he would like to see and the module seeks out all the morons, the purely of the skills her to fly these ships.

And you need not even a full API key for it ...

Monday, October 5, 2009

What Ties Goes With Grey Shirt

Sprint Planning with Scrum for Team System


After now 20 sprints to set for our team, an optimal sequence of the Organization of sprints. The tools we use Excel, TFS, Scrum for Team System (Conchango) and the Task Board for Team System . I want you three Blog parts imagine how we use the tools for SCRUM and how the end of the sprints designed it.

Part 1: Sprint planning
Part 2: Daily scrums
Part 3: Sprint Review & Retrospective

Part 1: Sprint planning

We have been building our 4th Sprint all artifacts of the sprints in to TFS. Using TFS to Begin was time-consuming than the use of index cards on tried and true whiteboards. But it has quickly established a routine and is promptly rewarded by automatically generated burndown charts, user stories, backlogs, test plans or version plans. All this information is preparing TFS on a timely and convenient. And for this effort and time spent really worth!
The sprint planning is at the beginning of each sprint. The following procedure (and time) has established itself:
  1. capacity planning of the team for the sprint period
    (15 minutes)
  2. development of TFS work items of type "Sprint"
    (1 minute)
  3. setting all the Sprint Backlog Items (SPI) for the upcoming product backlog items (PBI)
    (1 afternoon)
  4. Commitments of the team to the Sprint Goal
    (10 minutes)
  5. transferring the results into TFS
    (30 minutes)
a) capacity planning of the team for the sprint period
Before starting the sprint planning, the capacity of the team in the sprint period requested. I have this created an Excel template. In this enters each team member, how many days it is a week in the upcoming sprint duration.


Fritz


Günther


Anna


Gerd


1.Woche


3


5


5


5


2.Woche


5


0


5


5


3.Woche


5


0


5


4


Total (days)
13
5
15
14
sum (h)
104
80
120
112
correction factor
0.9
0.9
0.8
0.7
hours (approx.)
93
72
96
78
330

For team members, have the unpopular side jobs, which can hardly be part of the planning, we have introduced a correction factor empirically. This time we improve our estimate. Anna is our build Masterin (for other teams) and can develop only 80%, Gerd supports the support and therefore has a factor of 0.7 (70%). This is not to calculate the precise number of hours with "decimal point". Important, only the magnitude.

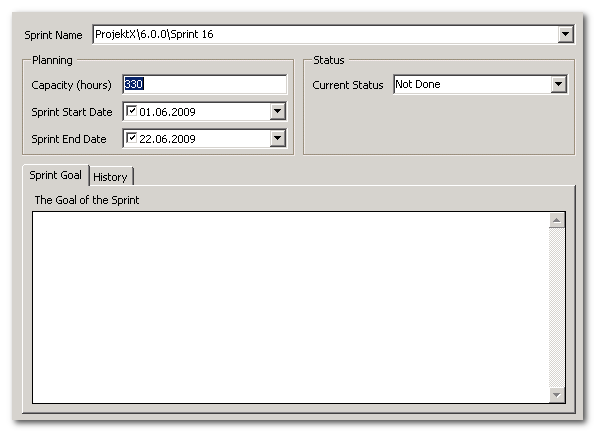
b) Development of a TFS work items of type "Sprint"
Now a new TFS work item is created, type "Sprint".
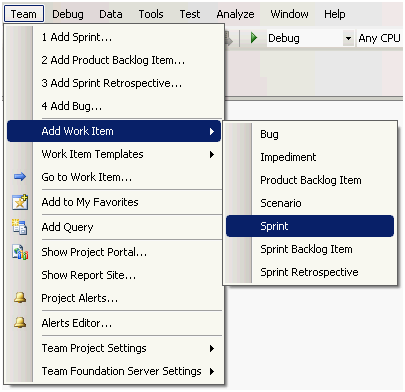
This is done via the menu entry Add Work Item .


The determined from the capacity planning hours are entered in the field Capacity (hours) . In field
Sprint name the iteration is selected (iterations are created in the TFS Project Settings). The field
Sprint Goal bleit still empty and is filled until the end of the planning meetings with the summary of commitment to the Sprint goal.

c) setting all the Sprint Backlog Items (SPI) for the upcoming product backlog items (PBI)
Now Finally we come to the core: the actual sprint planning!
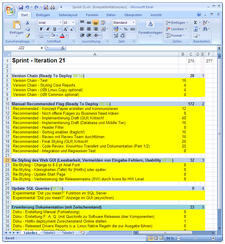
this purpose, the team in a room. The upcoming PBI is known then it applies to each of the PBI, the SPIs to be determined. These controls each team member's input to the task at hand. We consider this an Excel table set, we project with a projector on the wall. This is often very dynamic. Points are being added, which it will be deleted, it is estimated, distributed, combined ... This dynamic is the reason why we keep all the points, first in Excel and create not just in TFS. work items can not be erased together, or split up. How does

the Excel template from?

In its list of PBI, we write all the necessary SPIs and appreciate their effort.

legend

Product Backlog Item (sorted by priority)
sum hours
Sprint Backlog Items (defined in this planning session)
hours estimated

Use the sum function by Excel, the hours are calculated for the PBI. With capacity in mind is soon clear that PBI in the sprint can be implemented and what not.
The example below shows a planning table in Excel. The user story such as D can not be performed because the capacity already exhausted with C user story is.

1 User Story A
120
New data field "expired" in DB
4
Property and validation in MT
8
unit test
4
GUI extension
4
etc ...

2 User Story B
88
SPI 1
8
SPI 2
2
etc ...

3 User Story C
120
SPI 1
6
SPI 2
6
etc ...

4 User Story D
48
SPI 1
6
SPI 2
6
etc ...


Here is a screenshot of the sprint planning with Excel:


d Commitment) of the team to the Sprint Goal
At the conclusion of the sprint planning session, the team needs a commitment to Sprint Target release.
The Sprint Goal is a brief summary of what is being done in the proposed Sprint.

e) transferring the results into TFS
for the team members is to plan now complete. Then I prepare everything in TFS for the next sprint. This requires all Product Backlog Items (PBI) updated be and the new Sprint Backlog Items (SPI) is applied. First of all I
as a stale PBI the next sprint.

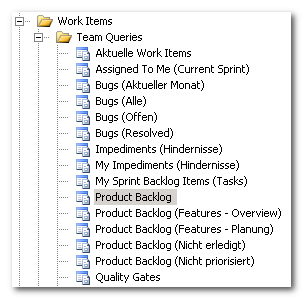
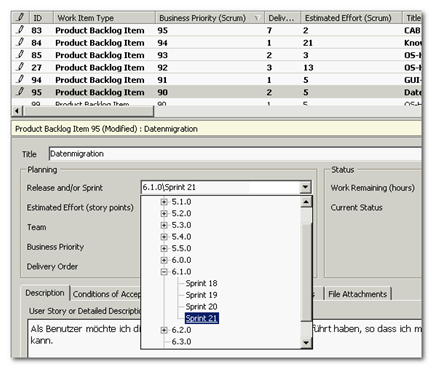
About the Work Item list, I sort Product Backlog Items to Business Priority .
Here, I assign the number to fast all affected PBI field Release and / or Sprint the sprint.

are updated every PBI I start the associated SPI. This can also be done via the Team Explorer. I'm using but the Task Board for Team System . This tool makes the work much more quickly and after 2-3 sprints you have paid for the license costs about 50 € loose.

You start the task board , selects the desired sprint and it is an appealing WPF interface that is reminiscent of a task board on a whiteboard.


All SPIs to a PBI, you can now create quickly
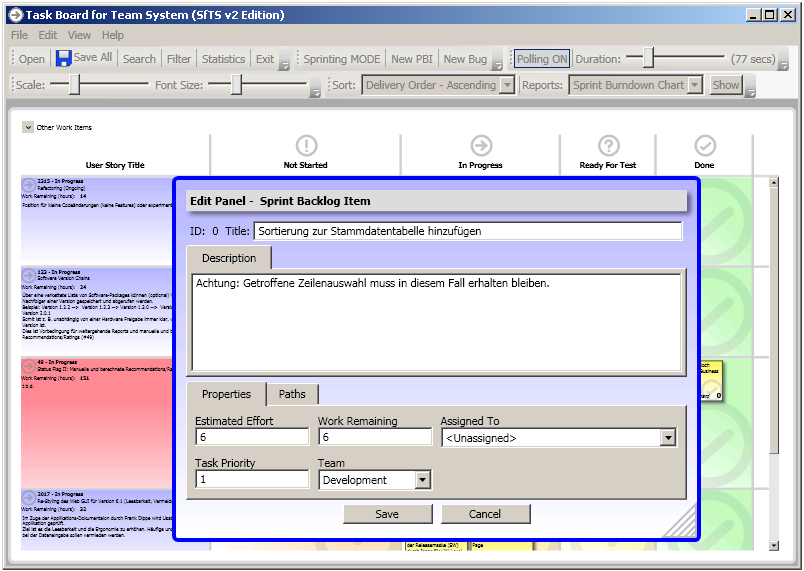
calls by using the context menu, the menu item Add Sprint Backlog Item .

In Title and Description you I shall indicate the most important items for the SPI. The field
Description is in fact often empty.
it is important to enter the hours under SPI Estimanted Effort and Work Remains . The field
Assigned To remains empty at the beginning. It was not until the Daily scrums share the tasks to team members themselves. can

are updated every PBI and built all the SPIs the sprint start ...